17 Pinecone Christmas Craft Ideas for Cozy Handmade Holiday Decor

That pile of pinecones under the pine in your yard is a craft box waiting to be opened. Add a little paint, some felt, and a handful of beads, and those cones become elves with jingle bell hats, reindeer with twig antlers, lace angels, and tiny snow-tipped trees.
None of it takes fancy tools or a big budget. This list rounds up 17 pinecone Christmas craft ideas made by real home crafters, with notes on what makes each one work and how to copy it at home.
Some are quick enough for a rainy afternoon with kids. Others make lovely gifts or table centerpieces. Grab a paper bag and start collecting.
How to Prep Pinecones Before You Start Crafting
Pinecones from the yard often carry dirt, sap, and the odd tiny bug. A little prep keeps your crafts clean and helps the glue actually stick. Do it once for a whole batch and you are set for the season.
- Shake and brush them. Tap each cone upside down and use an old toothbrush to clear out debris between the scales.
- Soak the grimy ones. A short soak in warm water with a splash of vinegar helps. The scales close up when wet, which is normal.
- Dry them low and slow. Spread them on a foil-lined baking sheet and bake at a low heat, around 200°F, checking often. This dries them, opens the scales back up, and helps get rid of hidden bugs. Never walk away from the oven, since sap can catch fire.
- Match the shape to the project. Tall, pointed cones make the best trees. Short, round cones suit animals and little characters.
- Pick a strong glue. Hot glue grabs fast on uneven scales. Kids can use a low-temp glue gun or tacky glue with an adult nearby.
1. Color-Coded Mini Pinecone Trees on Birch Slices
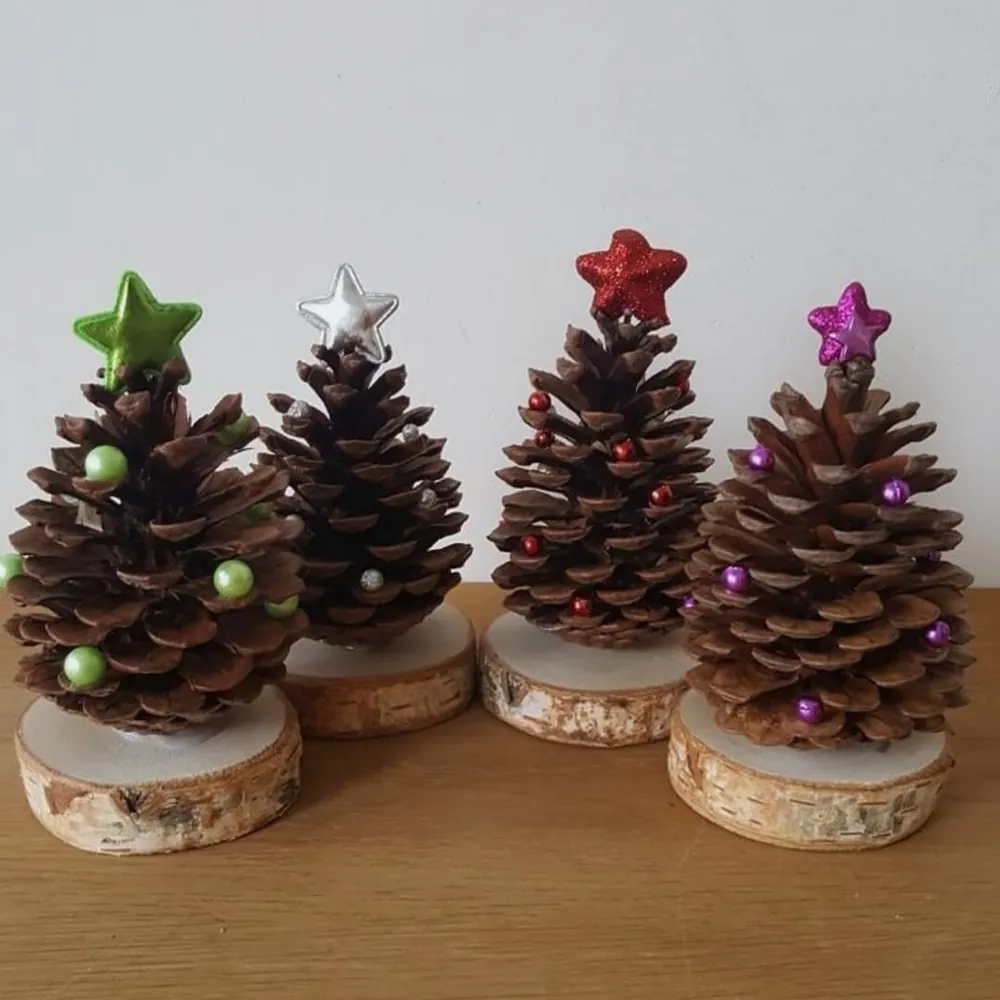
Four cones, four color stories.
Each little tree in this set sticks to one color. The green felt star gets green pearl beads, the red glitter star gets tiny red beads, and the purple star gets purple ones.
That simple rule is why the group looks planned instead of random. The cones stay natural brown, so the color stands out without any paint.
- Stand each cone on a birch slice. The pale wood makes the brown scales look richer.
- Tuck small beads between the scales with a dot of hot glue.
- Top each tree with a star cut from felt, glitter foam, or a sticker sheet.
Make one per kid and let each child claim a color.
2. Mossy Woodland Pinecone Trees with Star Anise Toppers
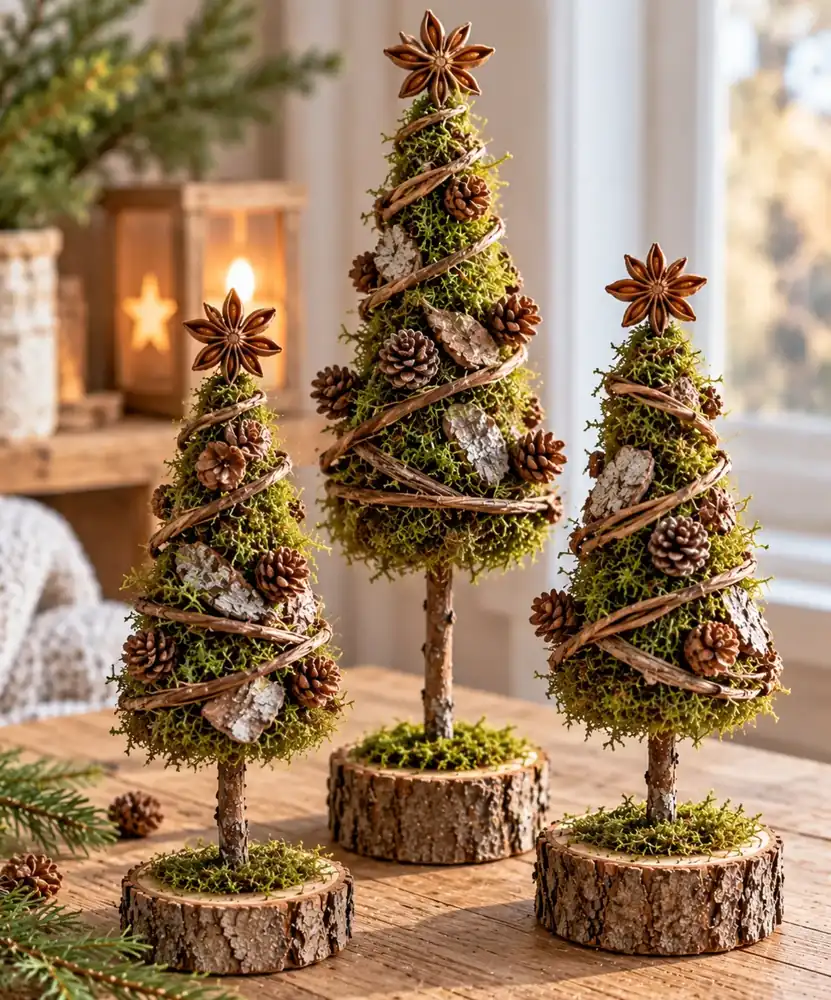
Green moss does the heavy lifting on these tabletop trees, and it hides every bit of the base underneath. Mini pinecones, curls of bark, and a spiral of twig vine sit on top, so the trees feel like they came from the forest floor.
The trunk: a real stick set into a bark-edged log slice, with more moss tucked around its base.
The wrap: thin vine strands spiral from top to bottom and give the cone shape a clear line to follow.
The topper: one whole star anise. If you cook with it, it is already in your spice drawer, and it smells lovely.
Push a sturdy stick into the bottom of a foam cone and glue the other end into a log slice.
Spread glue on one section at a time and press on dried or preserved moss in small handfuls.
Wrap the vine in a spiral, glue mini pinecones and bark pieces into the gaps, then add a star anise on top.
3. Snow-Tipped Green Pinecone Trees, Five Ways
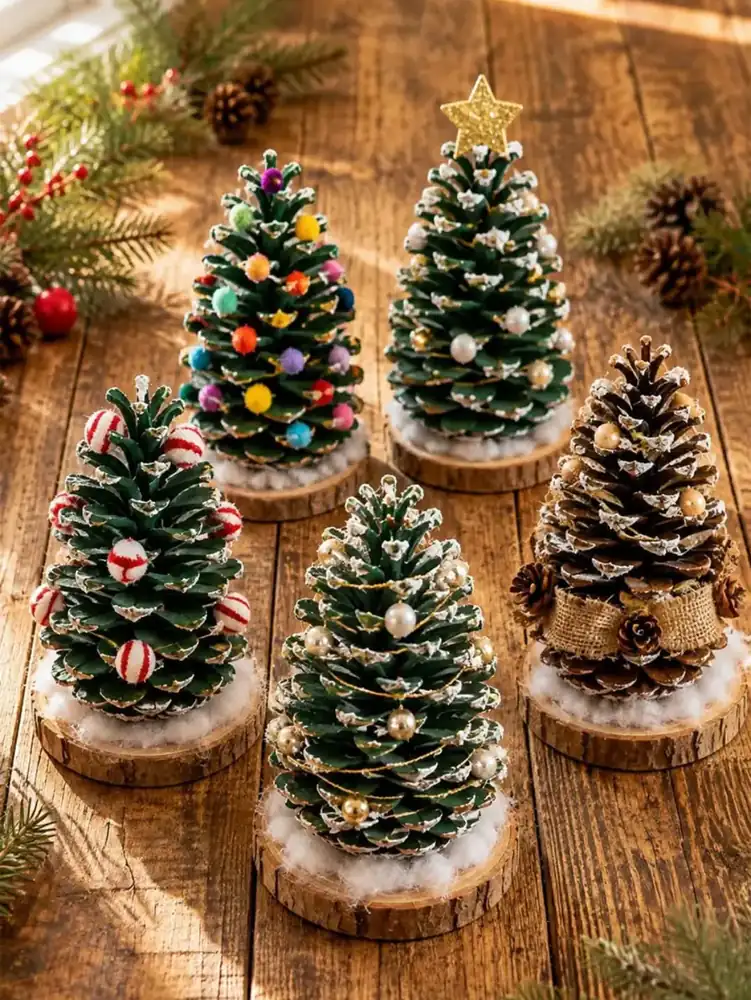
Paint one batch, then let each cone take on its own personality. Four of these cones wear a green coat with white dabbed on the scale tips, which looks like fresh snow.
The fifth stays natural brown with the same white tips and a burlap band, so you can see the snow trick works without green paint too.
Every tree sits on a wood slice with a puff of cotton batting as a snowbank. That one shared detail ties all five together.
For the snowy edges, dry brush the white. Load a flat brush, wipe most of the paint onto a paper towel, then skim it across the scale tips.
| Theme | What to add |
|---|---|
| 🌈 Rainbow | Mini pom poms in every color |
| 🍬 Peppermint | Red and white striped balls |
| ⭐ Starry | Pearl beads and a gold glitter star |
| ✨ Gold garland | Gold and pearl beads with gold thread wrapped around |
| 🌾 Rustic | Natural cone, burlap band, and mini pinecones |
4. Pinecone Dolls with Dangling Bead Legs
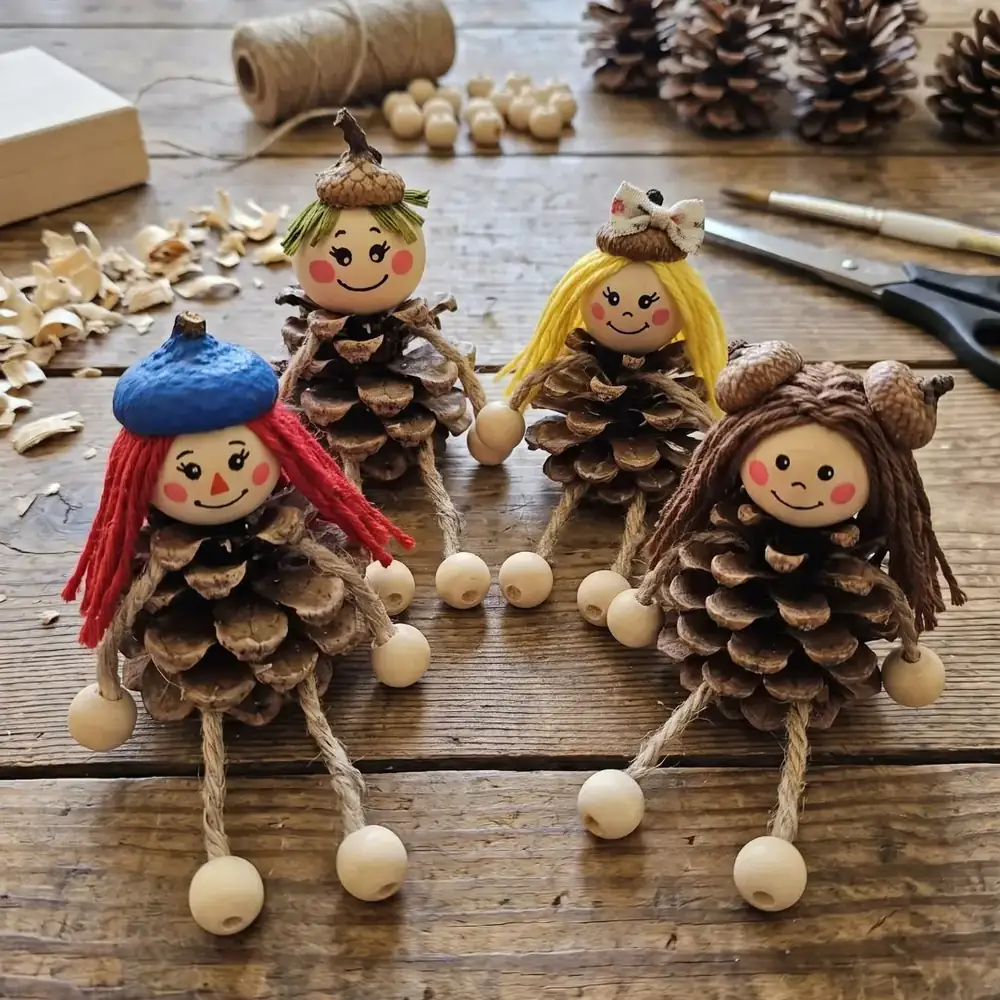
Kids tend to name these before the glue even dries. Each doll is a natural pinecone body with a round wooden bead head, dot eyes, and rosy painted cheeks.
Twine arms and legs end in wooden beads, so the legs swing over the edge of a shelf.
The hair is plain yarn in red, green, yellow, and brown. Acorn caps become hats, and one is painted blue like a tiny beret. Another wears a little fabric bow.
- Glue the bead head to the flat top of the cone.
- Glue short yarn strands around the head, then trim to length.
- Knot a bead onto each end of a twine piece and glue the middle under the scales for legs. Repeat for arms.
- Paint the face last with a fine brush or a paint pen.
What you need
5. A Stacked Pinecone Christmas Tree for the Table
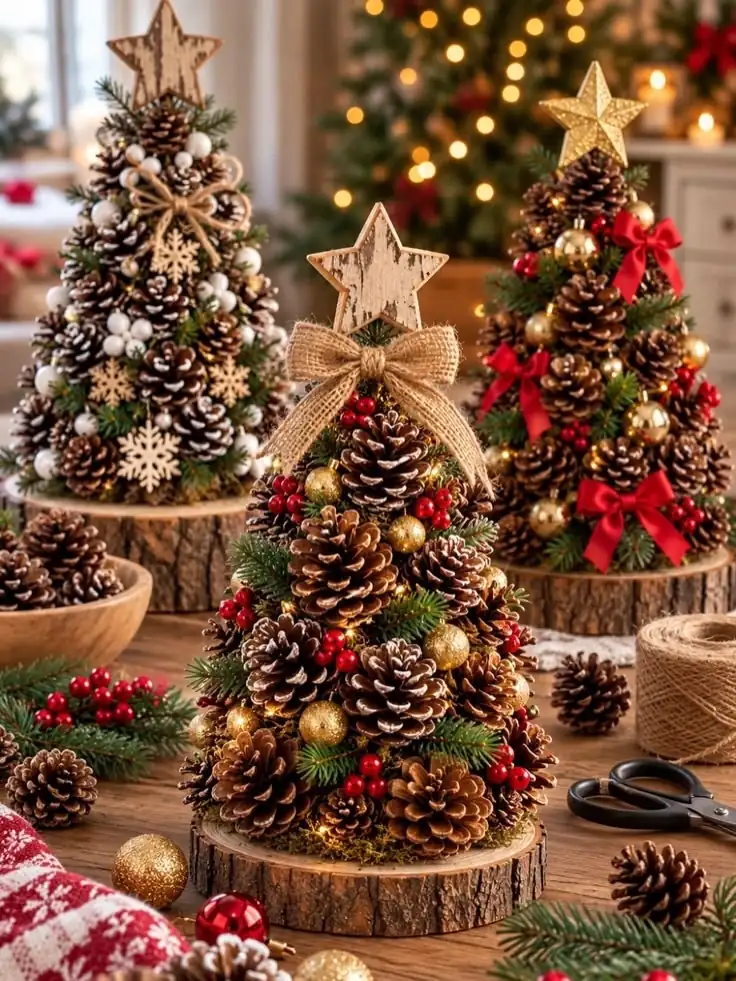
Got a big bag of pinecones and nowhere to use them? Build a whole tree. These tabletop trees are dozens of cones glued onto a cone-shaped base, set on a thick log slice. Sprigs of faux greenery fill the gaps so the base never peeks through.
The same build can wear three different looks, like the trees in this photo:
- Rustic: burlap bow, wooden star, red berries, gold balls, and a strand of fairy lights.
- Snowy: white balls, wooden snowflakes, and a twine bow.
- Classic: red ribbon bows, gold baubles, and a gold glitter star.
Start gluing at the bottom row and work up. Put bigger cones near the base and smaller ones near the top so the tree stays nicely tapered.
6. Santa, Reindeer, and Snowman Pinecone Characters
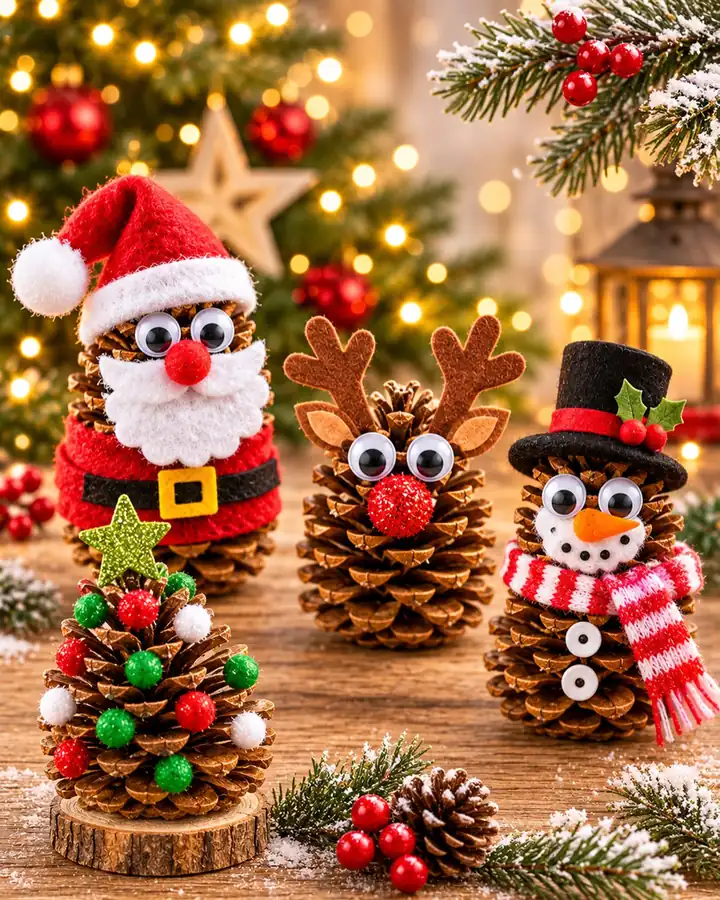
Felt scraps turn plain cones into a full holiday cast. Santa gets a red felt hat with a white pom pom, a felt beard, and a black belt with a gold buckle.
The reindeer wears brown felt antlers and a sparkly red nose. The snowman has a white felt face, an orange carrot nose, a mini top hat with holly, and a striped knit scarf.
All three share the same googly eyes, which is what makes them feel like a matching set. A fourth cone dotted with red, green, and white pom poms stands in as their Christmas tree.
Cut every felt shape first, then assemble them like a puzzle.
Stand the cone wide end down and build the face near the top.
Press felt firmly into the scales while the glue is still warm.
Tiny googly eyes on big cones. They get lost in the scales.
Cutting felt pieces too big. Scales stick out, so trim a little smaller.
7. Painted Pinecone Elves with Jingle Bell Hats
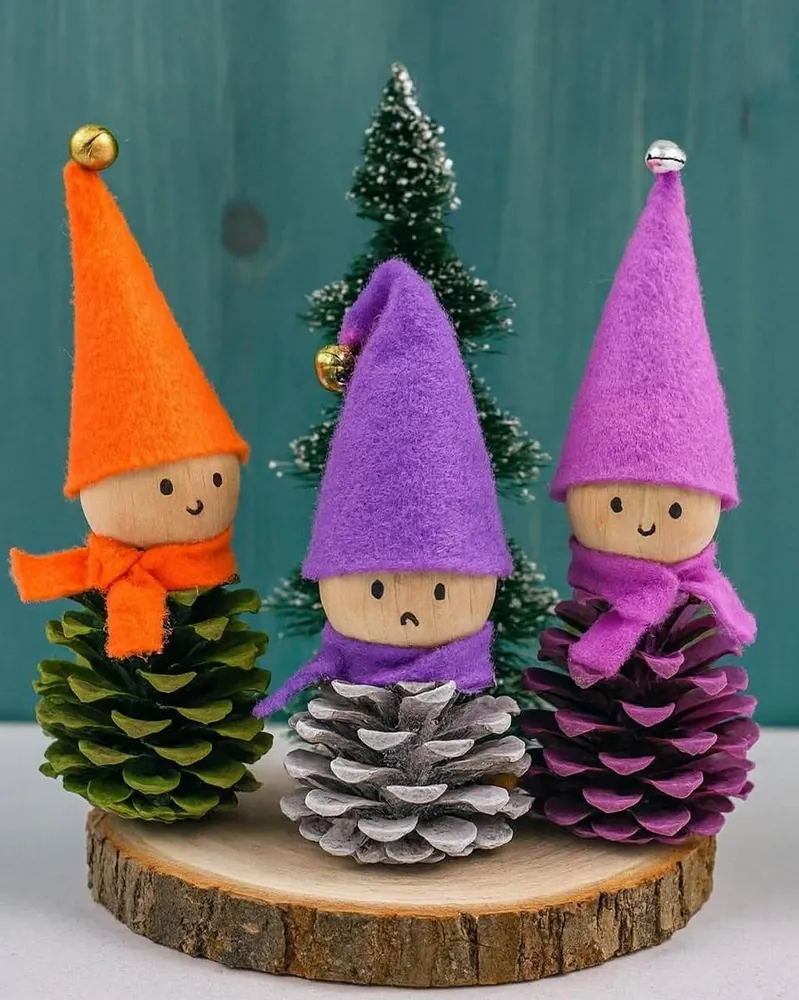
These little elves skip the natural brown look entirely. One cone is painted leafy green, one is brushed white over gray, and one is a bold purple.
A plain wooden ball sits on top with two dot eyes and a tiny drawn mouth. One has a worried little frown, and honestly, he steals the show.
The hats are simple cones of felt glued into a point, each with a small jingle bell on the tip. A strip of matching felt becomes the scarf and hides the glue line at the neck.
Group three on one wood slice with a mini bottle brush tree behind them and you have an instant shelf scene.
💡 Quick Tip
Spray paint is the fastest way to coat every scale. Hold the can back a bit and turn the cone a few times so color reaches the inner edges. Do this outside on newspaper.
8. Whitewashed Pinecone Gnomes with Slouchy Hats
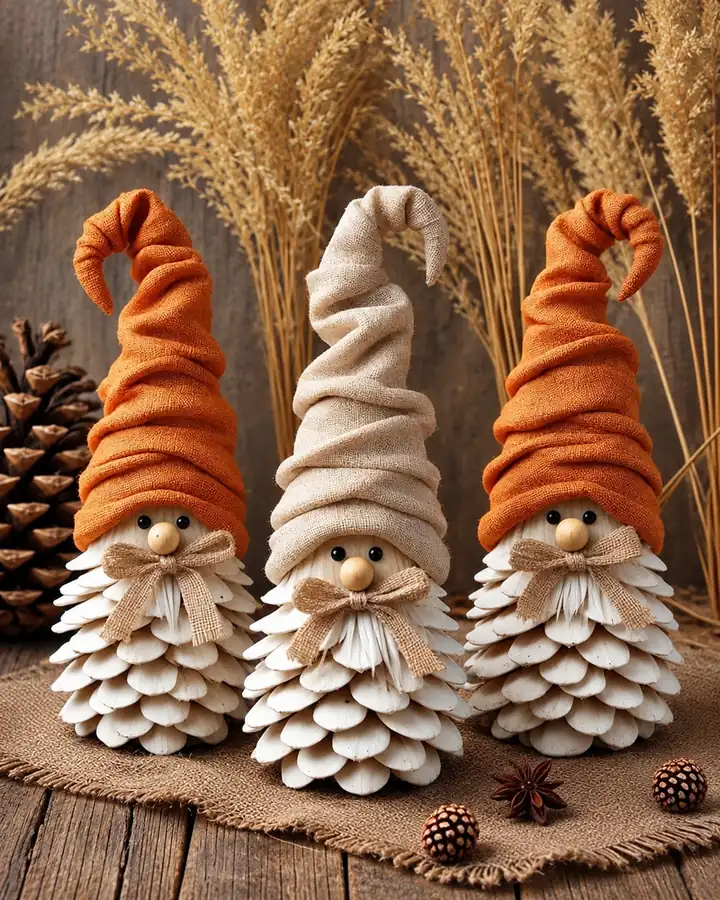
Rust and cream fabric hats give these gnomes a warm farmhouse feel, so they can go out before Thanksgiving and stay until New Year.
The cones are painted white, which turns the layered scales into something that reads like a fluffy beard.
Each face is just two small black eyes, a round wooden bead nose, and a little burlap bow tied under it like a mustache.
- Paint the cone white or cream and let it dry fully.
- Roll a long tube of loose-weave fabric, glue it to the top, and scrunch it down into soft folds.
- Bend the tip over and glue it so the hat droops.
A plain brown pinecone from the yard, a bit scruffy and easy to overlook.
A whitewashed gnome with a scrunched fabric hat, bead nose, and burlap bow that looks right on a farmhouse shelf.
9. A Simple Wreath with Hanging Pinecone Drops
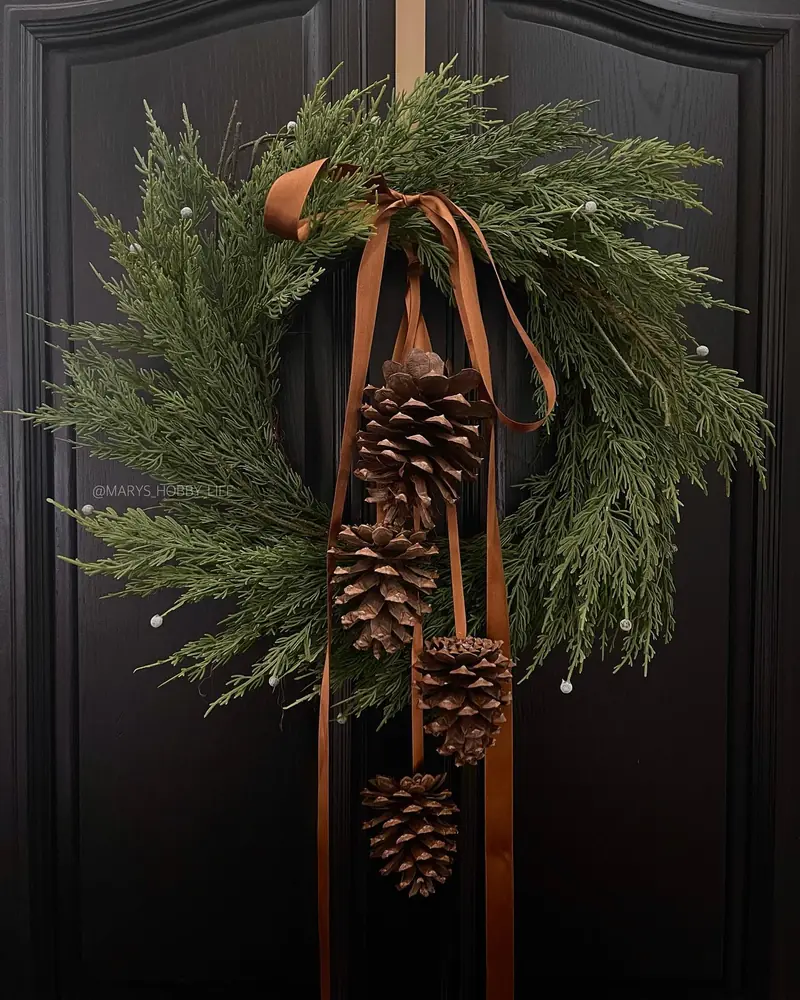
Sometimes the best wreath barely tries. This one is a loose ring of soft cedar-style greenery with tiny white berry tips, hung on a dark door.
Instead of gluing pinecones onto the wreath, four cones hang below it on long copper ribbon, each at a different length.
That staggered drop is the whole trick. It pulls the eye down and makes a small wreath look taller on the door.
- Tie a ribbon to the top of each pinecone, or wrap thin wire under the top scales first.
- Vary the lengths so no two cones line up.
- Finish with a big, loose bow at the top and let the tails hang long.
Letting the pinecones dangle keeps the wreath light and gives it movement. Against a dark door, the green and copper look rich without any extra decor.
10. Painted Pinecone Tree in Shades of Green and Teal
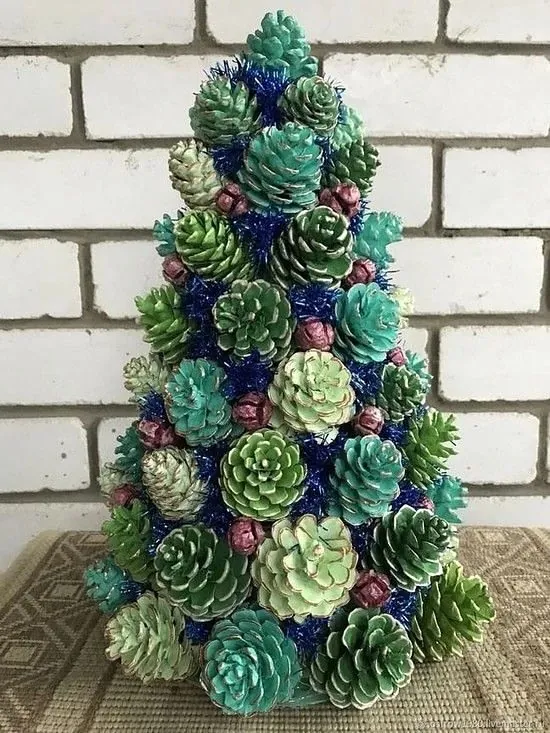
Up close, this tree looks more like a pile of succulents than pinecones. The trick is turning each cone so its flat bottom faces out.
The scales fan open in a rosette, and once they are painted mint, teal, sage, and deep green, they look like little plants.
Pale tips on many of the scales add depth, and strands of blue tinsel fill the gaps between cones. A few small dusty pink accents are tucked in for contrast. Set against white brick, all those greens stay bright.
Mix at least three shades so the tree never looks flat.
- ▸Paint the cones before gluing. Every scale is much easier to reach.
- ▸Dry brush a pale shade on the scale edges for that frosted rim.
- ▸Glue the cones onto a foam or cardboard cone with the bottoms facing out.
- ▸Push tinsel into any gaps so the base never shows.
11. Twig Antler Pinecone Reindeer
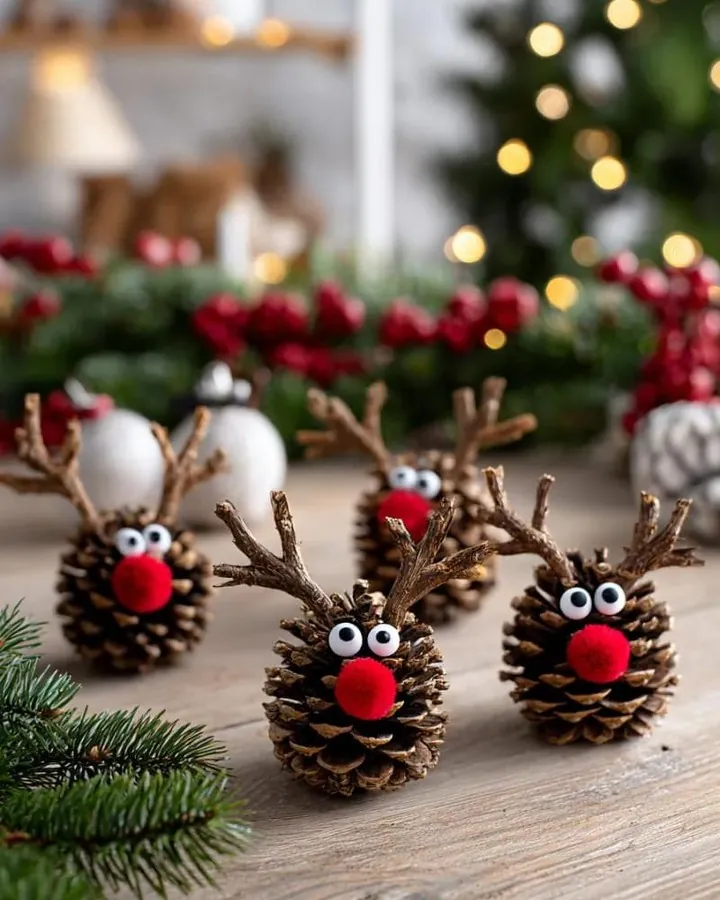
A couple of sticks, a pom pom, and two googly eyes. That is the entire supply list.
These reindeer use short, round pinecones, so they look chubby and cute. The antlers are real forked twigs, which look far better than pipe cleaners and cost nothing. A fluffy red pom pom nose sits right at the front, with the eyes just above it.
Save this one for a busy afternoon with little kids. An adult handles the hot glue while the kids hunt for twigs and decide where the faces go. Make a whole herd and line them up along a windowsill.
Pick a round cone and decide which side will be the face.
Snap two forked twigs to about the same length and glue them into the top scales.
Glue on the googly eyes, then press a red pom pom nose just below them.
12. Pinecone and Pillar Candle Centerpiece
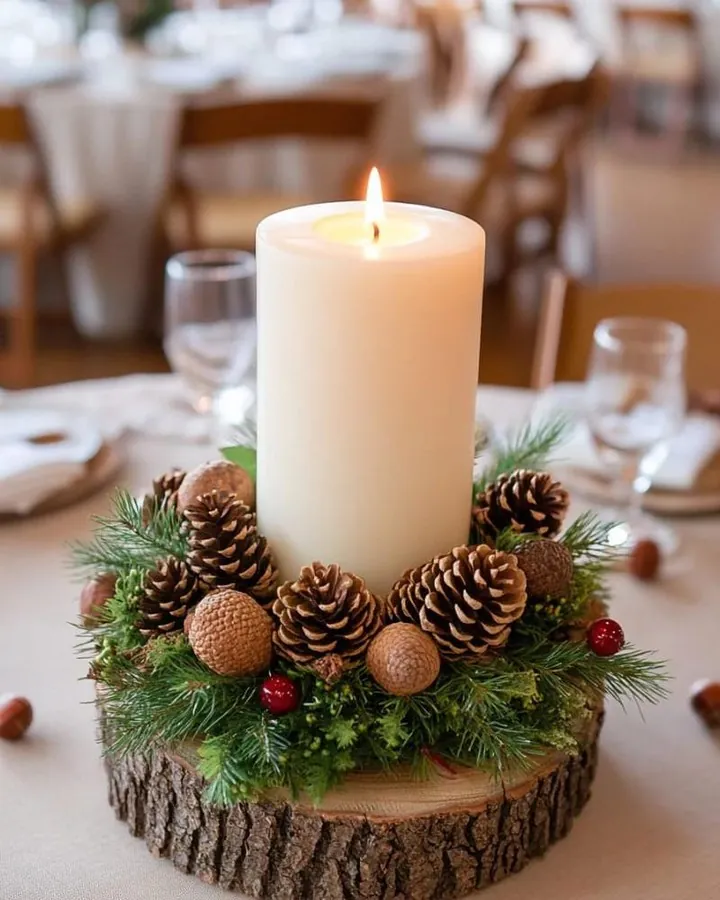
One wide pillar candle on a thick, bark-edged wood slice gives this centerpiece real presence, even on a long table.
Around the base sits a ring of pine sprigs, natural pinecones, round textured accents, and a few red berries.
- Use a slice that is much wider than the candle so the greenery has room.
- Set the candle on a heatproof plate or holder in the middle of the slice.
- Lay the greens in a ring first, then tuck the pinecones in by twos and threes.
Scatter a few acorns on the tablecloth around it so the display spills onto the table a little.
⚠️ Watch Out
Dry pine and pinecones catch fire easily. Keep all greenery a few inches back from the flame, never leave the candle burning alone, and switch to a flameless LED pillar if kids or pets are around.
13. Pinecone Snowmen on a Rustic Tray
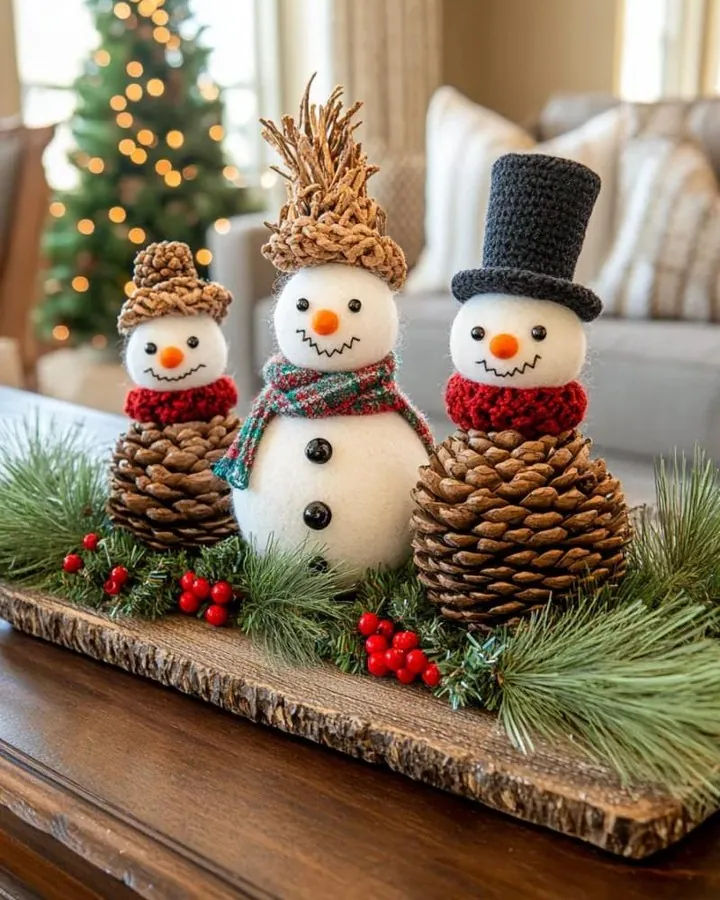
Not every snowman here is made from a pinecone, and that is why the display works. Two of them use pinecone bodies with soft white felted heads, orange carrot noses, stitched smiles, and chunky red knit collars.
One wears a crocheted brown hat, the other a black knit top hat. The middle snowman is all white with a plaid scarf and black buttons, which gives the group a tall, bright center.
They sit on a bark-edged board with pine sprigs and clusters of red berries. Grouped that way, they read as one arrangement on a coffee table instead of three loose crafts.
| Pinecone body | All white body |
|---|---|
| Brown texture, rustic look | Clean, bright, classic look |
| Free if you forage | Needs felt or foam balls |
| Sits low and sturdy | Adds height to the middle |
14. Pinecone Buddies in Tiny Knit Beanies
An old sock might be the most useful supply on this list.
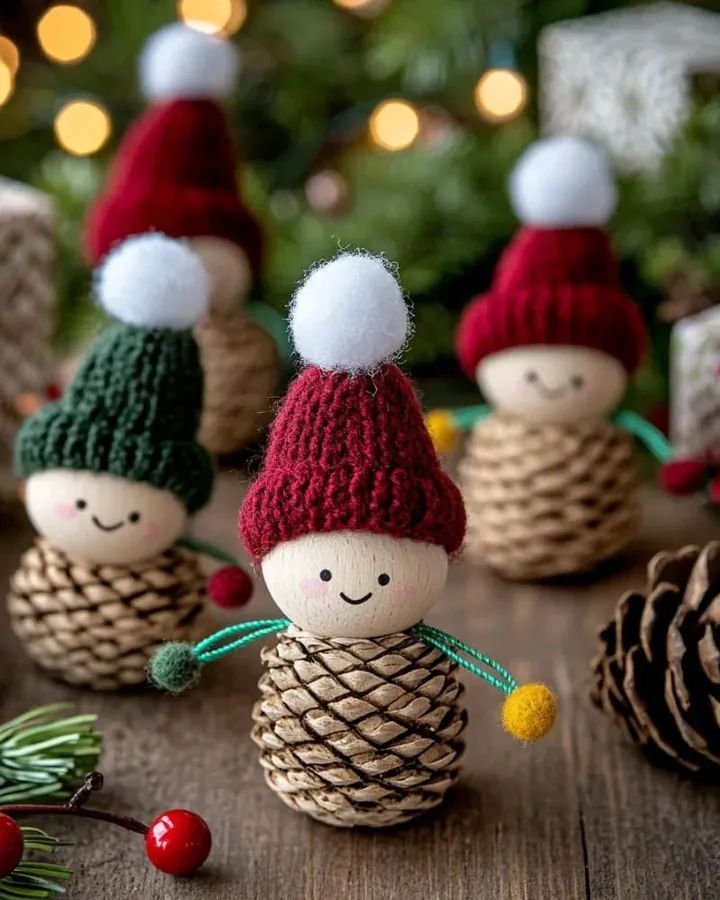
These little buddies have pale cones, plain wooden bead heads, and simple smiling faces with pink cheeks. The real charm is the hats.
Each one wears a mini knit beanie in deep red or forest green, topped with a fat white pom pom. A thin green cord loops around the neck with tiny pom poms on the ends, like scarf tassels.
The cut-off cuff of a knit sock or the finger of an old glove makes a fast beanie. Fold the raw edge up for a brim, tie the top closed, and glue on a pom pom.
15. Lace Doily Pinecone Angel Ornament
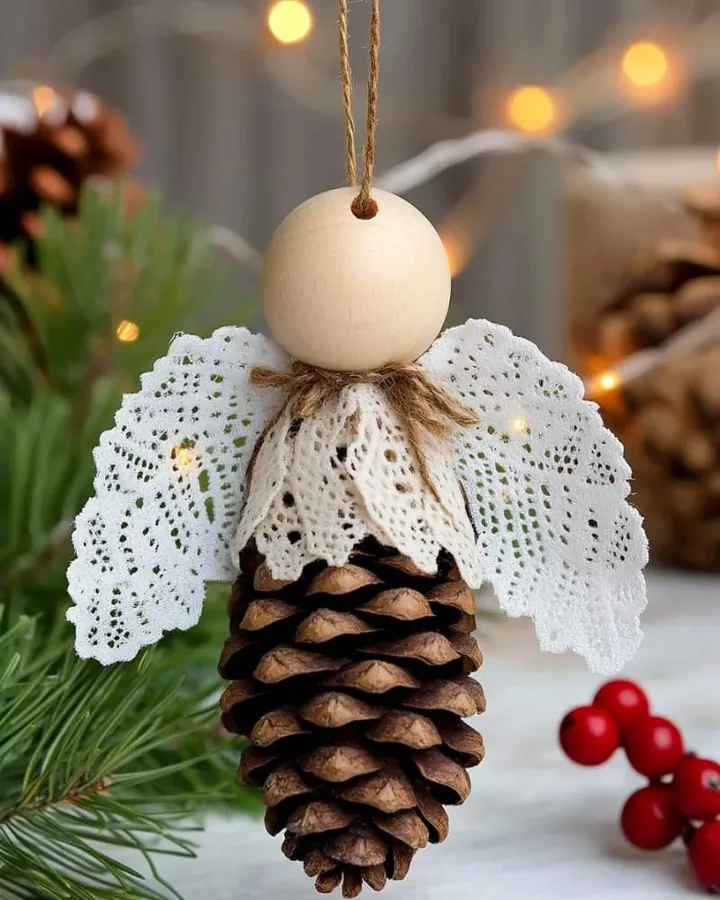
Paper or fabric doilies make the sweetest angel wings. This ornament uses a natural pinecone pointing down as the body, with a large plain wooden bead as the head.
White lace forms a collar and two wings, and a twine bow tied at the neck finishes it off. A loop of twine runs through the bead for hanging.
Nothing here is painted, so the angel suits a rustic tree or a neutral one. Make a few extra and tie them onto gift bags as a second little present.
Thread twine through a large wooden bead and knot it to make the hanging loop.
Cut a round doily into quarters. Glue two pieces to the back as wings and wrap a third around the wide end of the cone as a collar.
Glue the bead on top of the collar, then tie a small twine bow at the neck.
16. Rosemary Pinecone Place Card Holders
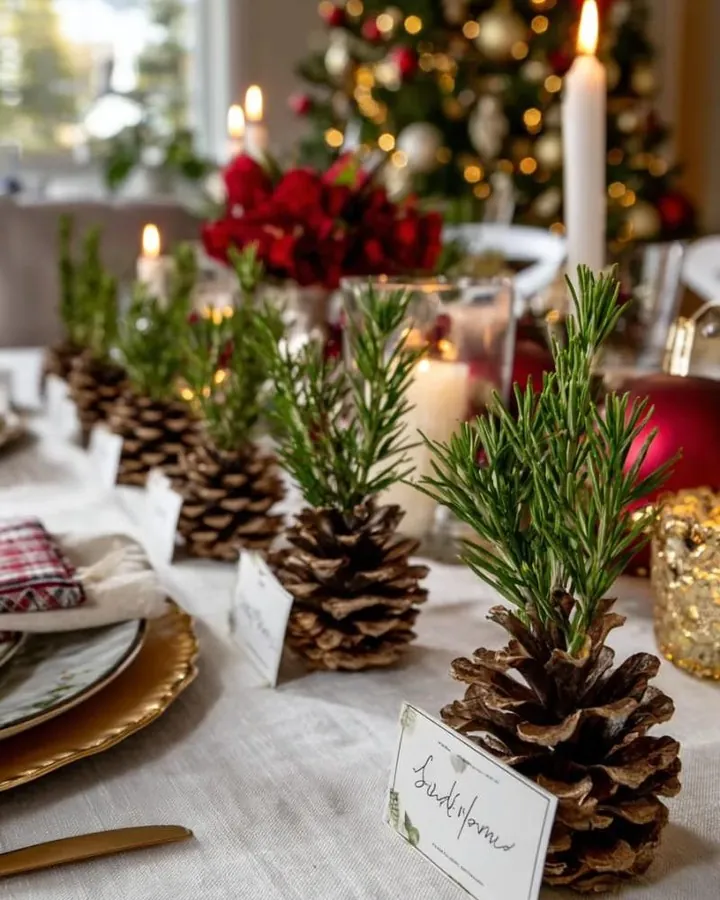
Each seat gets its own tiny tree. A natural pinecone stands upright with a sprig of fresh rosemary tucked into its top, and a handwritten place card leans against the base. Down a long table, the row of little green tops looks like a miniature forest.
The rosemary is the smart part. It smells good, stays green through the whole meal, and guests can take it home for cooking. It also gives the brown cones fresh color without any paint.
Pick cones that stand straight on their own, or trim a thin bit off the bottom so they do not tip.
17. Easy Pinecone Christmas Craft for Kids: Trees in Cardboard Tube Pots
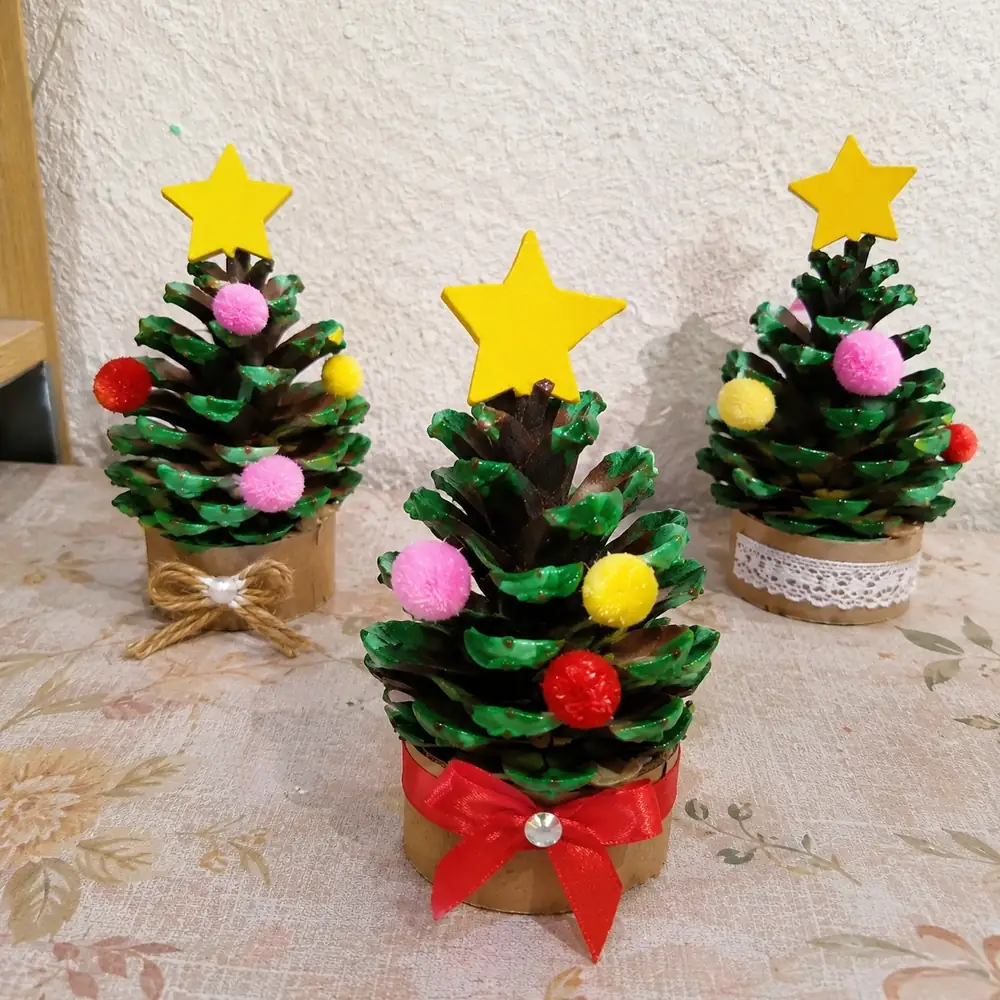
This is the classroom-friendly take on the pinecone tree, and it uses things most homes already have.
The scales are painted green only on the tips, so a little brown shows through like shading.
Small pom poms in pink, yellow, and red act as ornaments, and a bright yellow foam star sits on top.
Each tree stands in a short section of cardboard tube that works as a pot. Then every pot gets its own finish:
- A red satin bow with a sparkly gem in the center
- A twine bow with a pearl
- A band of white lace
Small hands can do almost all of it, and that is the best part.
Use washable paint and a sponge dabber on the scale tips.
Pre-cut the tubes and foam stars for younger kids.
Hot glue for little hands. Tacky glue or glue dots work fine.
Loose glitter, unless you want to find it until spring.
Wrapping Up Your Pinecone Crafting Season
Pinecones are about as humble as craft supplies get, and that is exactly why these projects are so fun.
A cone that cost nothing can become a doll with swinging legs, a frosty little tree, a lace angel, or the centerpiece everyone notices at dinner.
Short on time? Start with the twig reindeer or the rosemary place cards. Save the mossy trees and the stacked tabletop tree for a slow weekend.
Prep a big batch of cones now and you will have plenty left over for gifts. Save this pinecone Christmas craft list for the next time you want fresh ideas for the holidays.