DIY Christmas Table Centerpieces: 16 Ideas Your Guests Can Actually See Over

Christmas dinner has a funny way of sneaking up on you. The menu gets planned weeks ahead, the good plates come down from the top shelf, and then the night before, someone asks what is going in the middle of the table.
These 16 DIY Christmas table centerpieces answer that question with things you probably already have: mason jars, a bag of cranberries, spare wine glasses, old ornaments, and a few clippings of pine.
Some take a few minutes at the kitchen sink. Others make a cozy weekend project the kids can help with. Every one comes with simple steps, and the candle ideas include tips to keep them safe.
1. Floating Cranberry Mason Jar Candles Lined Down the Runner
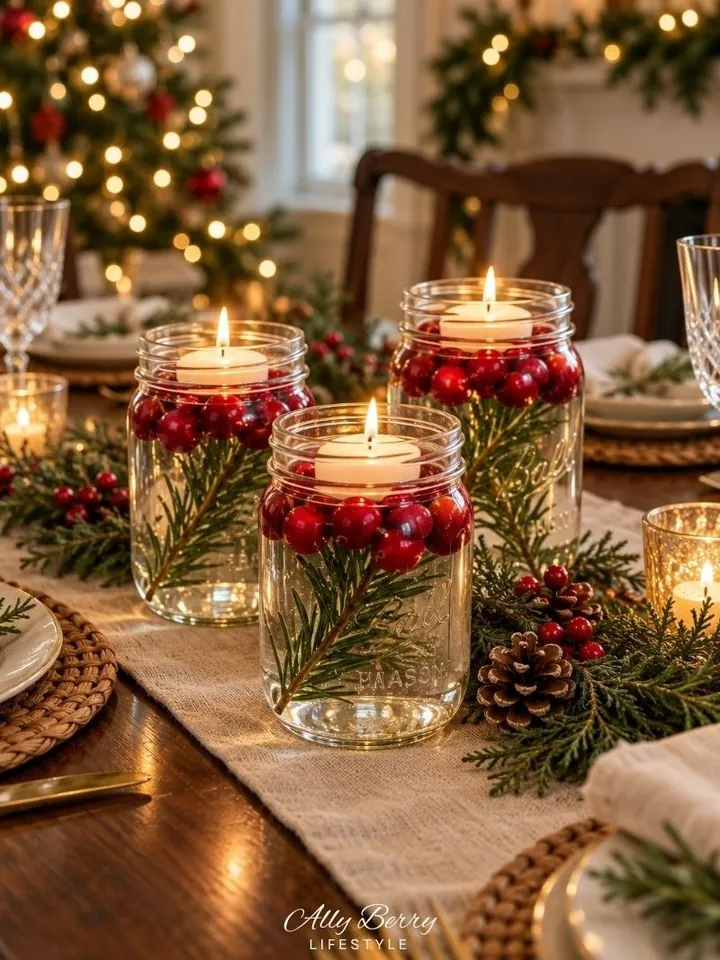
Three plain mason jars, a bag of fresh cranberries, and a few evergreen clippings make the easiest glowing centerpiece on this list.
The cranberries float to the top and hug the candle in a ring of red, while a single sprig of greenery sits underwater like it was pressed in glass.
Set the jars down a linen runner, then fill the gaps with loose cedar, a pinecone, and a few berry clusters so the line reads as one long piece instead of three lonely jars.
Slide a sprig of pine or cedar into each clean jar so it leans against the glass with the nicest side facing out.
Fill each jar most of the way with cold water, then pour in a big handful of cranberries. They will rise to the top on their own.
Top up the water, leaving a small gap below the rim, and set a floating candle in the middle of the berries.
Stagger the jars a little instead of lining them up like soldiers. It looks more relaxed and leaves room for the bread basket.
2. Wicker Basket Hurricane Packed With Moss and Winter Berries
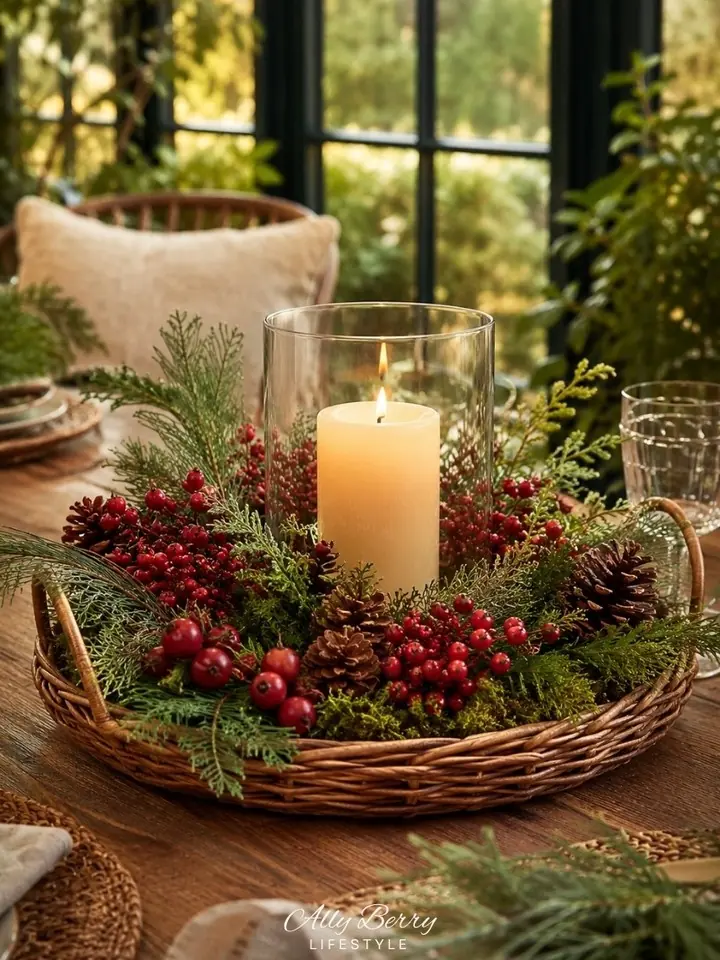
Low, wide, and full, this basket shines on a round table where a long runner piece would look lost.
The secret is the glass hurricane in the middle. It lets you pile greenery right up to the candle without worrying about a stray needle catching.
Everything else is layered in rings around it, so the arrangement looks lush from every chair.
Notice how the greens are not all one kind. Soft, feathery cedar, darker pine, and a patch of bright moss give it texture.
The berries come in two sizes too, with small clusters tucked low and a few bigger round ones resting near the rim.
Keep the basket handles in view. They make the whole thing easy to lift off the table when dessert comes out.
3. Tall Red Berry Branches in a Clear Cylinder on a Wood Slice
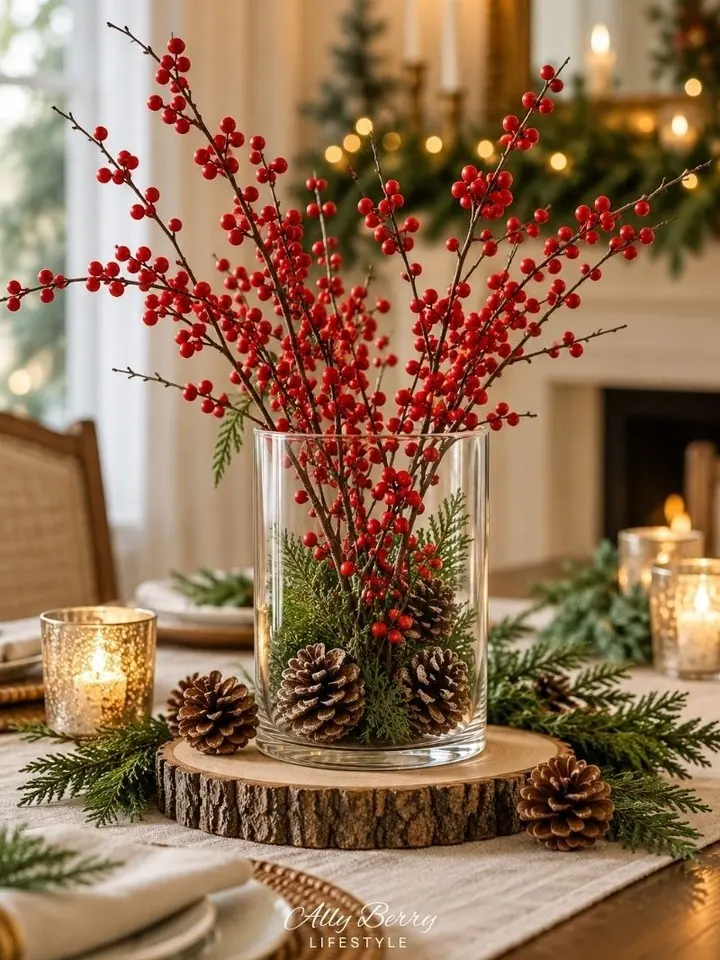
Height usually blocks the view across a table. Bare berry branches are the exception, because you can see right through them.
Here a tall glass cylinder holds a loose spray of red berry stems. The bottom of the vase is packed with cedar and a few pinecones, which hides the stem ends and gives the glass something pretty to show.
A thick round wood slice lifts the vase a little, and mercury glass votives on each side keep the light low and warm.
The big decision is real stems or faux ones.
| Real berry branches | Faux berry stems |
|---|---|
| Natural, uneven twigs that look wild | Stay bright and full all season |
| Slowly dry out and may drop berries | Can be reused for years |
| Berries like holly and winterberry should stay away from kids and pets | No fallen berries on the floor |
| Best for one big dinner | Best if you decorate early in December |
Spread the stems into a loose fan before you drop them in. A tight bunch looks stiff.
4. Santa Tray Vignette With a Bow-Tied Vase
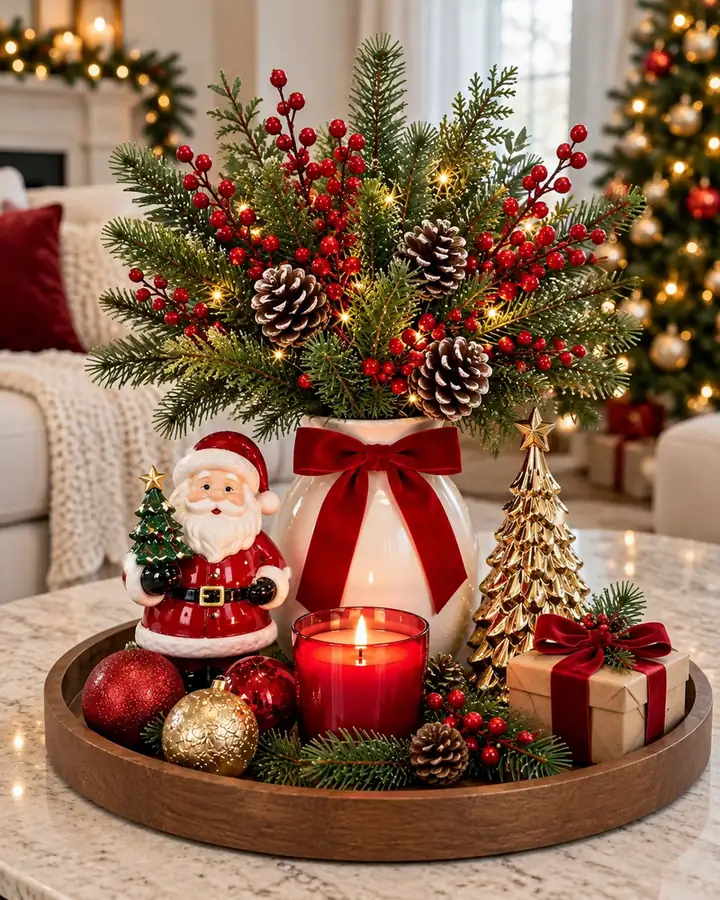
Your decor bins probably hold most of this one already.
What pulls it together:
- A plain white vase made festive with one wide red velvet bow
- Greenery, red berry picks, and pinecones arranged loose and tall, with tiny fairy lights threaded through
- A ceramic Santa on one side and a gold tree on the other, so the height steps down from the vase
- Small fillers around the tray rim: glitter ornaments, a red jar candle, and a little wrapped gift box
Wrap an empty jewelry or tea box in brown kraft paper and tie it with leftover bow ribbon. It costs nothing and finishes the corner. When the jar candle is lit, keep it clear of the gift box and greenery, or swap in a flameless one.
5. Ornament-Filled Vase With a Tiny Christmas Village
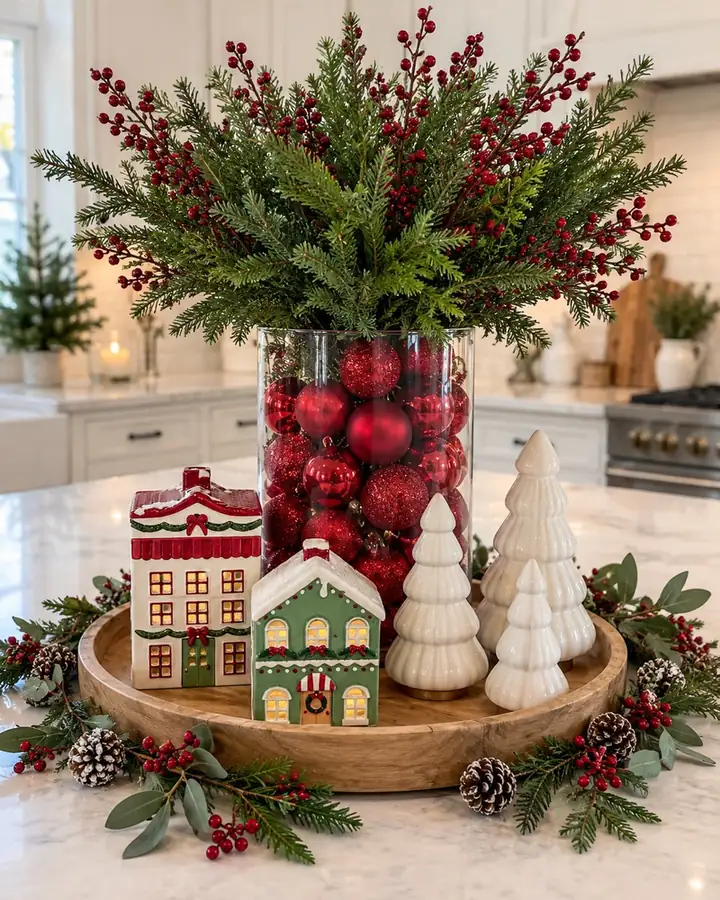
Clear vases tend to look empty in winter. Filling one with red ornaments fixes that and gives the greenery on top a bright, solid base. A mix of matte, shiny, and glitter finishes keeps all that red from looking flat.
The charm is the little scene at the foot of the vase. Two ceramic houses with glowing windows sit up front, three white ceramic trees cluster on the right, and a loose ring of pine, eucalyptus, berries, and frosted pinecones circles the tray.
Fill the vase with shatterproof ornaments so it stays light and nothing breaks if it tips.
Set the houses and trees at different depths on the tray, some forward and some back.
Lining every piece up in one straight row like a store shelf.
Packing the greens so thick on top that they hide the ornaments.
The whole tray moves easily between the kitchen island and the dining table, no rearranging needed.
6. Upside-Down Wine Glass Snow Globe With an Ornament Swoop
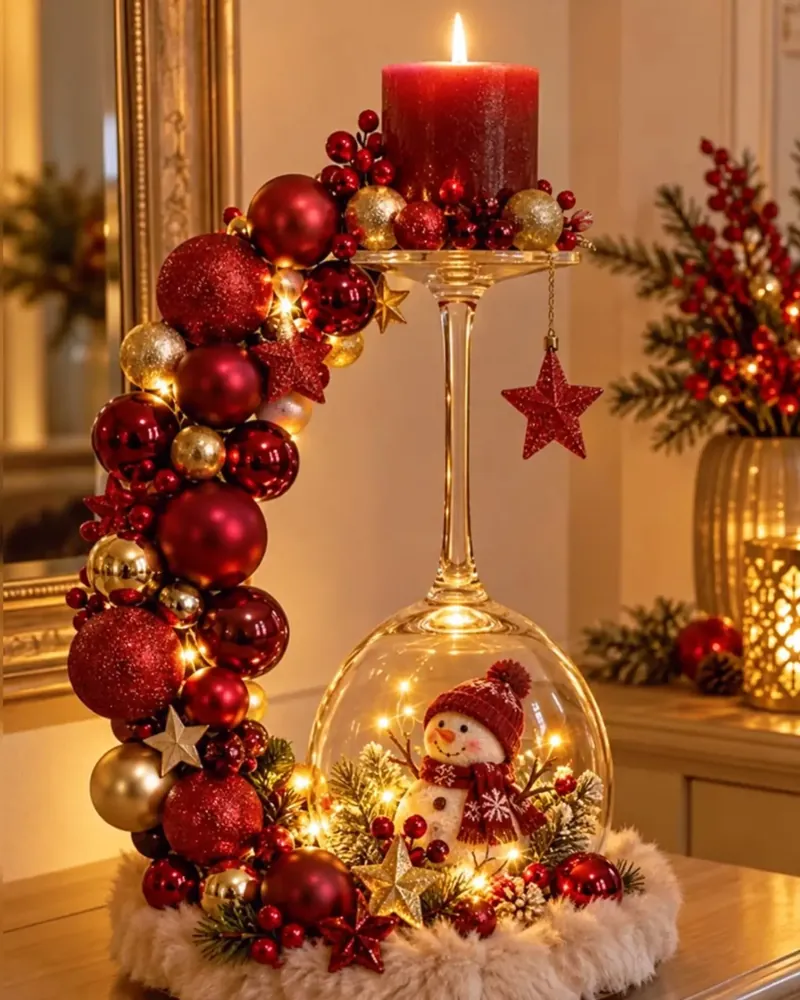
Flip a large wine glass over and the bowl turns into a little snow globe. Inside this one, a small snowman in a knit hat stands among mini pine sprigs and red berries, with a strand of tiny warm lights wrapped around him. A ring of faux fur at the base hides the rim and looks like fresh snow.
What makes it stand out:
The swoop. Red and gold ornaments in mixed sizes curve from the fur base up to the glass foot. One easy way to build it is to hot glue the ornaments along a bent piece of thick craft wire, big balls first, then small ones and berry picks in the gaps.
The top. A red pillar candle sits on the flat foot, ringed with berries and tiny ornaments.
The dangling star. One glitter star hanging off the edge breaks up all the round shapes.
⚠️ Watch Out
Plastic ornaments, glitter, and berry picks sit right against the candle on this one. Use a flameless pillar candle on top. The glow looks nearly the same, and you can leave it on all evening.
7. Dusty Rose Pillar Candles and Metallic Trees in a Wooden Tray
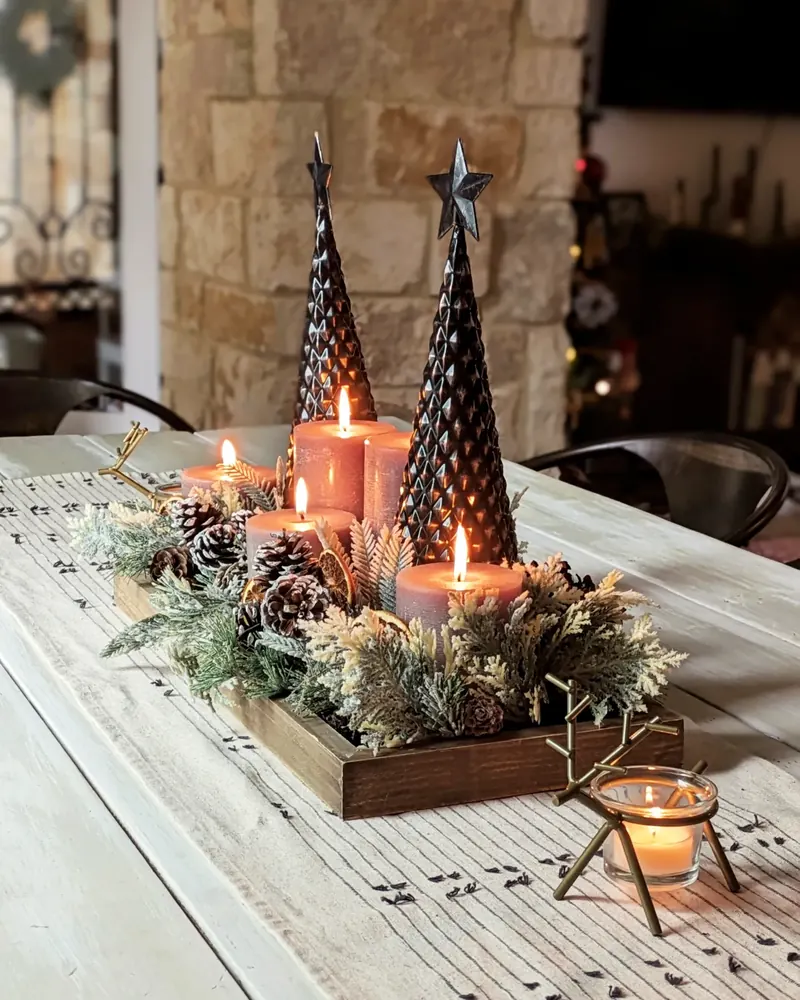
Not every Christmas table needs to be red and green.
Here, dusty rose pillar candles in a few heights sit in a shallow wooden tray, and two tall, dark metallic cone trees with star toppers rise up behind them.
The greenery is frosted, which softens everything. Small surprises hide in the mix: pinecones, a dried orange slice, a few feathery sprigs.
Off to the side, a little gold reindeer holds a single tealight on the striped runner. It stretches the centerpiece across the table without making the tray any bigger.
If you build your own, keep the frosted greens tucked low and well below the flames.
Soft pink candles, dark shiny trees, and pale frosted greens are three quiet colors that look rich side by side. The contrast does the heavy lifting, so you need very few pieces.
8. Mini Burlap-Wrapped Trees With Dried Oranges and Cinnamon
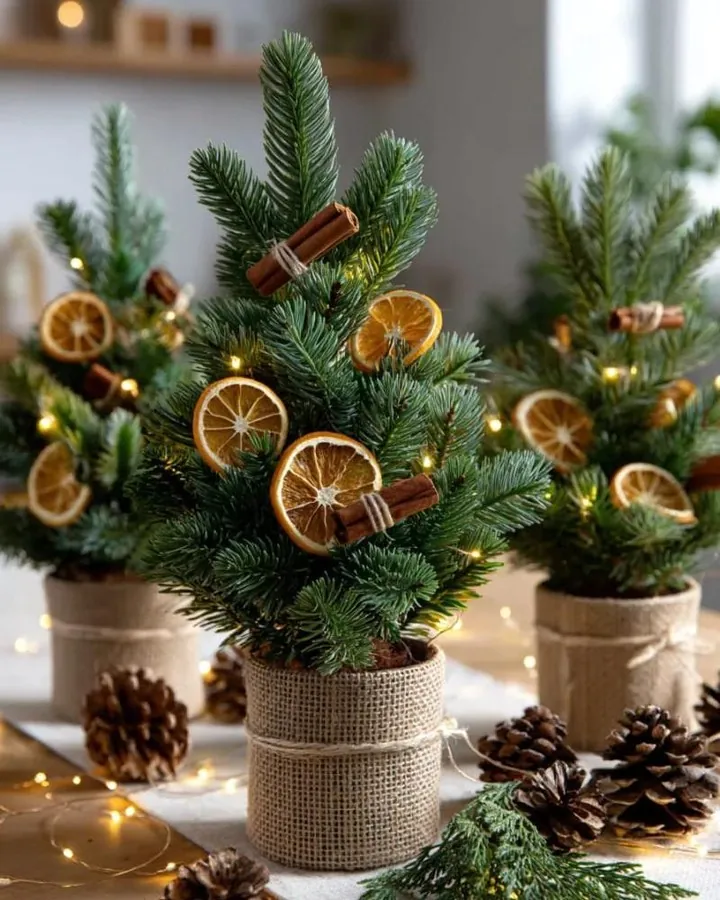
Three little trees down the middle of the table feel like a tiny forest you can still talk across.
Each one sits in a pot wrapped in burlap and tied with plain twine. The decorations all come from the kitchen: dried orange slices and cinnamon sticks bundled with a bit of string.
A strand of warm fairy lights winds through the branches and trails onto the table between scattered pinecones. Real potted evergreens bring a fresh smell, while faux tabletop trees pack away for next year.
Recreate this look
Orange slices dry faster when you cut them thin and pat off the juice first.
9. Burlap-Wrapped Jar Candle With Pine and Star Anise
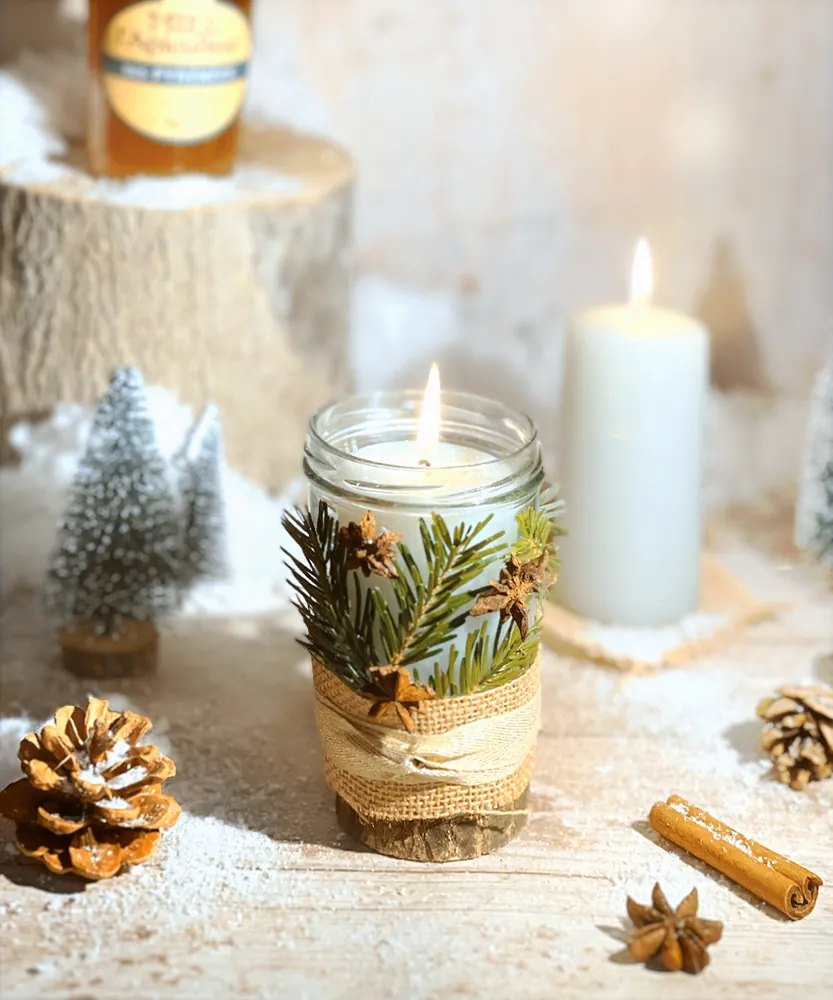
A plain store-bought jar candle is all you need to start this one.
A wide band of burlap wraps the lower half of the jar, with a strip of cream ribbon wound over it.
Short pine sprigs and whole star anise pods are tucked under the band so they stand up against the glass.
The jar sits on a thin wood slice, which makes it look like a finished piece instead of a candle someone set down.
Around it, a dusting of faux snow, a pinecone, bottle-brush trees, and a loose cinnamon stick build a little winter scene. Make two or three and run them down a narrow table.
A plain glass jar candle sitting straight on the table.
The same candle wrapped in burlap, tucked with pine and star anise, and set on a wood slice with a sprinkle of faux snow.
Trim the pine so the tips stay below the rim. The flame burns low inside the glass, and nothing should lean over the opening.
10. Linen Napkin Trees as a Mini Centerpiece at Every Plate
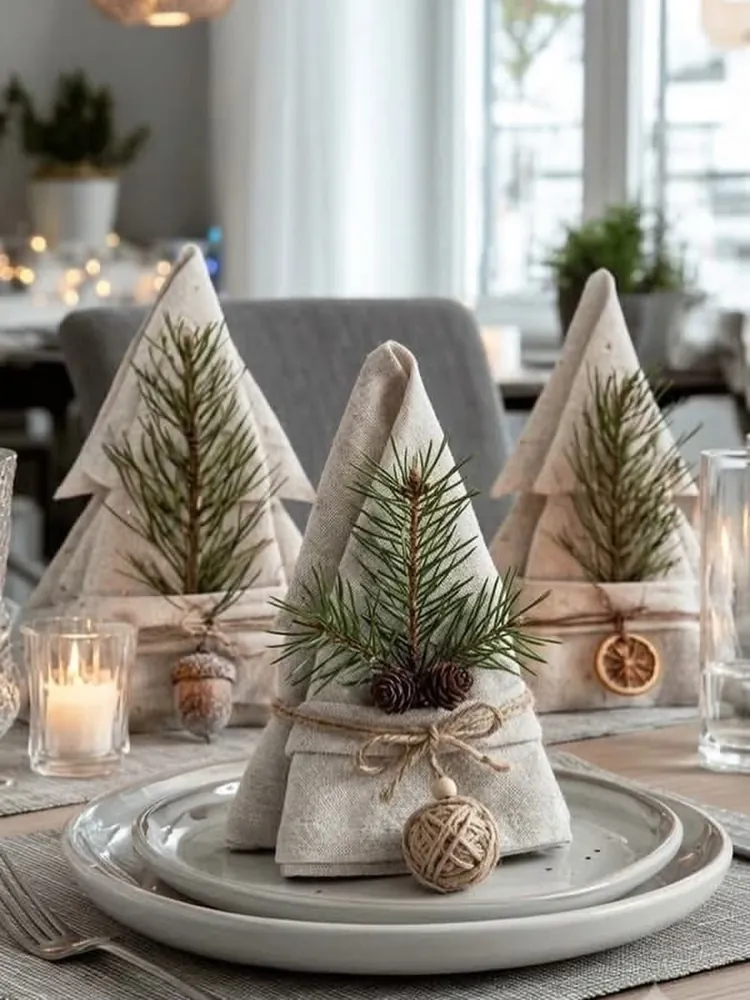
Small table? Skip the big middle piece and give every guest their own little tree.
Each linen napkin here is shaped into a tall cone with a cuff at the bottom, then dressed with a pine sprig, two mini pinecones, and a twine bow.
A small charm hangs from each bow: a twine ball on one, a wooden acorn on another, a dried orange slice on the third. Tealights in clear glass between the plates finish the table.
Fold a square napkin in half corner to corner to make a triangle.
Roll it from one side into a tall cone, keeping the point at the top.
Fold the bottom edge up into a cuff so the cone stands on its own.
Tie twine around the cuff, tuck in a pine sprig and mini pinecones, and hang a small charm from the bow.
Linen with a little spray starch holds the shape best. Soft cotton napkins tend to slump by dessert.
11. Wine Glass Candle Stands With Ornaments Tucked Underneath
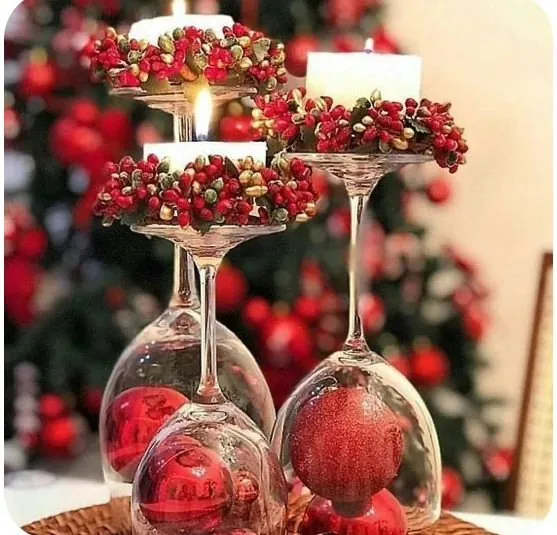
Borrow three wine glasses from the cupboard for this one. Turn them upside down, slip a red ornament under each bowl, and set a short white pillar candle on each flat foot.
The finishing detail is the berry ring around every candle. Small rings of red and gold berries hide the spot where candle meets glass, and they tie the three pieces together.
A woven charger underneath groups the glasses so they read as one centerpiece instead of three stray drinks.
The candles also land at slightly different levels, which keeps the trio from looking stiff. Mix glass sizes if you have them.
💡 Quick Tip
Glass feet are small and slippery. Press a pea-size bit of removable putty under each candle so it stays put if someone bumps the table, and pick candles no wider than the foot.
Blow the candles out before they burn down close to the berry rings.
12. Plaid Ribbon Hurricanes With Flameless Candles
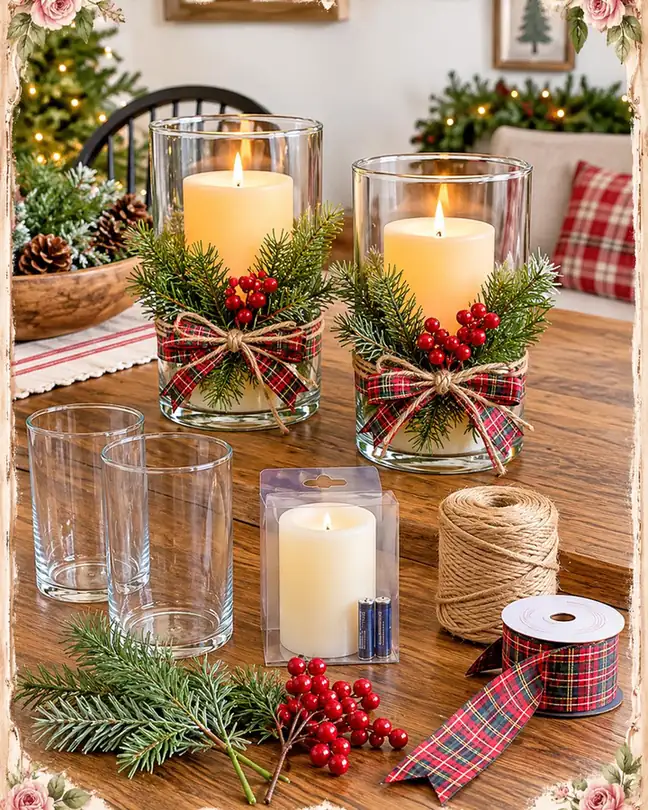
The photo shows the whole supply run, which makes this one easy to copy.
Two clear glass cylinders each hold a flameless pillar candle. A band of red and green plaid ribbon wraps around the middle of each glass, and a natural twine bow is tied on top of it.
A few pine sprigs and a cluster of red berries sit tucked behind the bow so they fan out to both sides.
Because the candles run on batteries, the greenery can press right against the glass with no worry, and the pair can stay lit through the whole meal.
Your supply list
Tie the ribbon first and the twine second. That thin bow sitting on the wide plaid band is what makes it look layered.
13. Plaid Bow Ornament Bowls Set at Two Heights
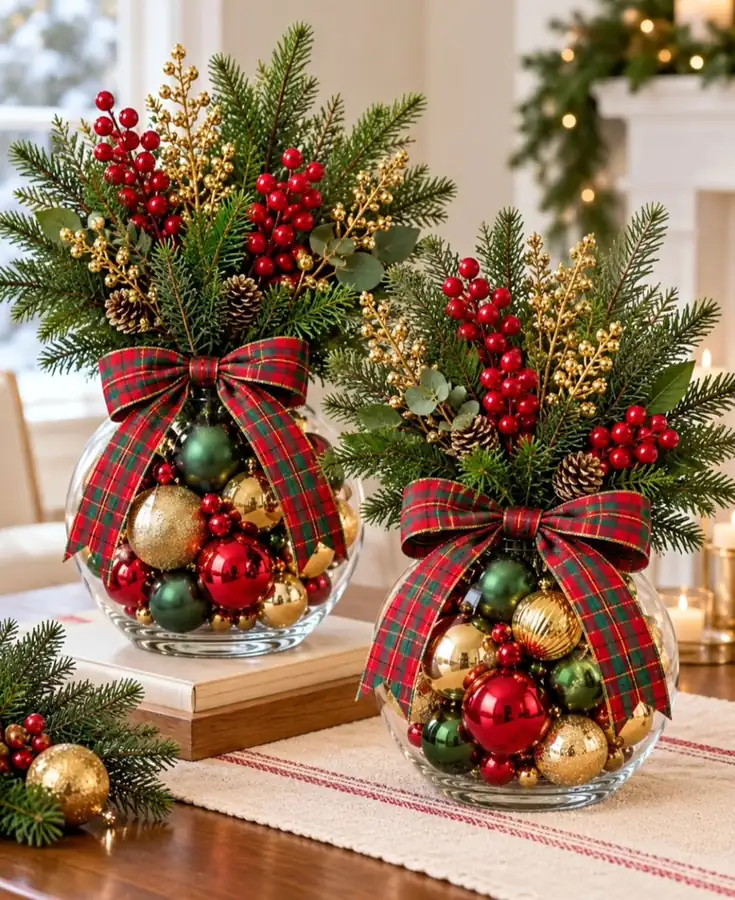
Round bubble vases hold a lot of ornaments, and that is the whole point here. Red, green, and gold balls fill each bowl to the top, with a few loose red berries rolled in between.
On top sits a full arrangement of fir, cedar, a few eucalyptus leaves, red berry picks, gold glitter sprays, and pinecones.
A big plaid bow wraps the neck of each bowl and hides the spot where the greens meet the ornaments.
The smart move is height. One bowl stands on a short stack of books, so the pair looks staggered instead of matched. When you fill your own bowls, think about which ornaments to use.
| Shatterproof ornaments | Glass ornaments |
|---|---|
| Lighter, so the bowl is easy to move | Heavier, with a deeper shine |
| No harm done if the bowl gets knocked | Can break into sharp pieces |
| Fine to pack tight and push stems into | Need a gentle hand when you add greens |
| Good pick for homes with kids or pets | Good for a table nobody bumps |
14. A Cluster of Cranberry Candle Jars for Last-Minute Hosting
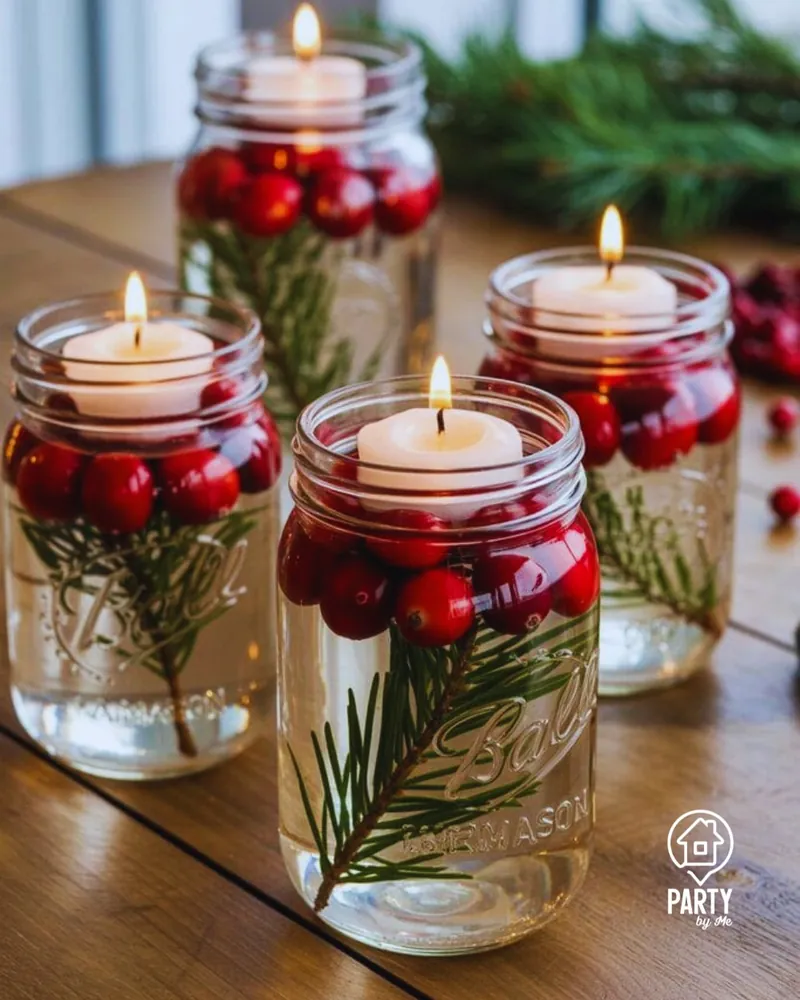
Idea number one lined the jars down a runner. This version groups four jars in a loose diamond on a bare wood table, and it shows how flexible the floating candle trick really is.
Long pine sprigs go in each jar this time, and the cranberries crowd right up to the candle. Grouping the jars close lets the light bounce from glass to glass, so four small flames look like one bigger glow.
It is also one of the fastest centerpieces to pull together on party day. Most of the work happens at the kitchen sink.
Buy an extra bag of cranberries to top up any jar that looks thin.
Fill the jars a few hours ahead and float the candles right before guests sit down.
Light them with a long lighter or match.
Moving the jars once they are lit. Water sloshes, spills, and can put out the flame.
Leaving them burning after everyone leaves the table.
Any cranberries you do not use can go straight into the freezer for sauce later.
15. Lit-From-Within Mason Jars With Greenery Bouquets
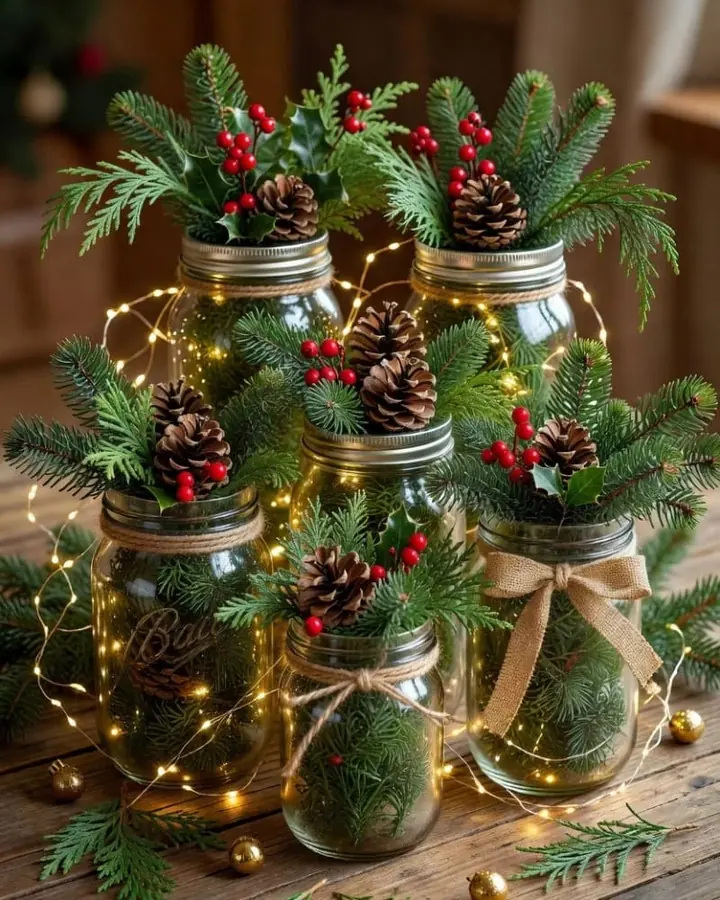
No flames at all in this one, so it works well on a kids’ table or a crowded buffet.
Five mason jars are stuffed with cedar and pine, then threaded with tiny battery fairy lights so each jar glows from the inside.
Small bouquets of evergreen, holly leaves, red berries, and a pinecone or two spill out the top.
The metal ring bands stay on as a clean collar, and twine or a burlap bow dresses a few of the necks. The bows are not all the same, which keeps the group from looking store-bought.
Tuck the battery packs behind the jars or under a fold of greenery so nobody spots them.
16. Honeycomb Paper Tree in a Wooden Dough Bowl
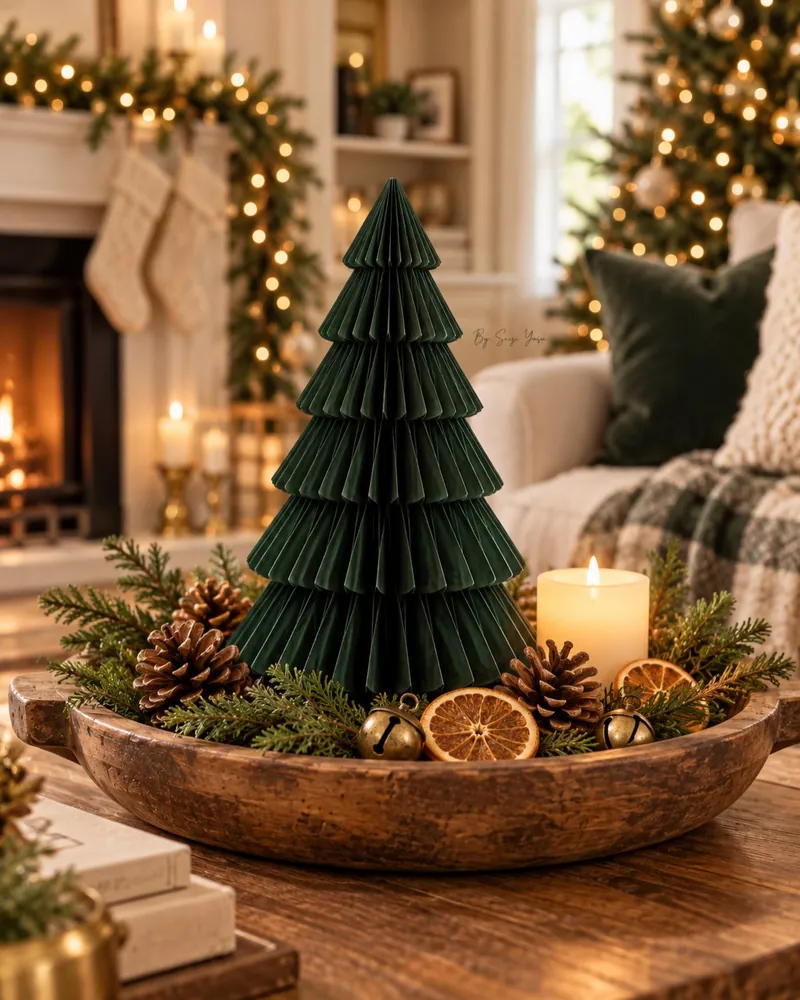
Deep green paper, folded like a fan, stands in for a real tree and never drops a needle.
A honeycomb paper tree is easier to make than it looks. Craft stores sell honeycomb tissue sheets. Cut them into a half-tree shape, glue them between two cardstock covers, then open the tree all the way around and clip or glue the covers together. A dark forest green like this one looks rich rather than party-store bright.
The tree sits in a long wooden dough bowl with fresh greenery, pinecones, dried orange slices, and a few brass jingle bells. The bells and oranges add warm color against all that green.
One change worth making at home: the pillar candle next to the paper tree should be flameless. Paper and an open flame do not belong that close.
One bold shape in one deep color, set in a bowl full of natural texture. It looks simple and full at the same time, and the paper tree folds flat for next year.
How to Make Any Centerpiece Work on a Real Dinner Table
A centerpiece that looks great in a photo can turn into a nuisance once plates and platters land. A few quick checks keep it pretty and practical through the whole meal.
- ▸Keep it low or see-through. Seated guests should be able to see each other. Tall pieces work when they are thin and airy, like bare berry branches, or when they move to the sideboard once food arrives.
- ▸Shield every real flame. Use a glass hurricane, a jar, or a flameless candle whenever greenery, paper, ribbon, or plastic ornaments sit nearby. Never leave lit candles alone.
- ▸Build on a tray. A tray, basket, or wood slice lets you lift the whole piece off in one move when the table gets crowded.
- ▸Prep greenery a day ahead. Cedar and pine hold up well. Let fresh cuttings sit in a bucket of water overnight, then mist them before guests arrive.
- ▸Shop your house first. Jars, glasses, old ornaments, and ribbon scraps cover most of these ideas, so you only buy what is missing.
Pick One and Make It Yours
You do not need sixteen centerpieces. You need one that suits your table, your schedule, and the supplies already in your cupboard. If the week is packed, go with the floating cranberry jars or the napkin trees.
If you have a free Saturday, the wine glass snow globe or the honeycomb paper tree makes a fun project, and both come back out every year.
Whichever you choose, set it out a few days early so you know how it sits next to your plates and serving dishes. Save these DIY Christmas table centerpieces to your holiday board so the ideas are ready when December gets busy.